
Swap space is that region on the hard disk that is used by the operating system to store information when the RAM has been fully utilized or exhausted. If you are running a system with less than 8GB, it is highly recommended that you create some swap space. Once the RAM is fully used, Linux starts to kill some processes which would interrupt the functioning of some of your processes. In this guide, we focus on how you can add swap space to your Linux system.
Let’s dive in and see how you can create swap on your system
Step 1: Checking if you have swap already enabled
Before anything else its prudent that you first verify if you have swap space added on your system. To achieve this , run
$ free -h
Output

As you can see from the output above, swap is not configured. Now we shall probe the system to see if we have sufficient space on the hard disk to create swap space
$ df -Th
Output
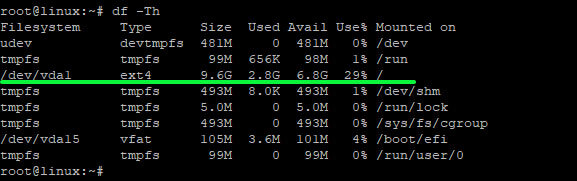
From the output above, we can see that we have some free space of about 6.8G. We now have the green light to proceed
2. Create Swap File
We are going to create a swap file using the fallocate command as shown below
$ sudo fallocate -l 1G /swapfile
You can verify the creation of swap by running
$ swapon -show
Output

Great! As you can see from the output, we have successfully created a swap file of 1024M with the label /swapfile
In the next step, we are going to convert the newly created swap file into swap space
Step 3. Convert Swap file into Swap space
Let’s begin by adjusting file permissions of the swap file to restrict access to other regular / non-root users
$ sudo chmod 600 /swap-partition
You can verify the set permissions using the ls command as shown
$ ls -lh /swapfile
Output

As we can see above, only the root user has read and write access. To convert the swap file into swap space, execute the command
To convert the swap file into swap space run
$ sudo mkswap /swapfile

Again, to verify that you have created the swap run
$ free -h
Output

This time around, you can see that swap has been allocated a space of 1.0G which hasn’t yet been used.
Step 4. Make Swap persistent after reboot
The swap we have just created does not survive a reboot, therefore we need to make it permanent. To do this, you need to append the following line to /etc/fstab
/swapfile swap swap deafults 0 0
Run the command below
$ echo "/swapfile swap swap deafults 0 0" >> /etc/fstab
To verify, run
vim /etc/fstab
output

Awesome! At this point, we have successfully created swap and enabled it permanently on our system!
Give it a try and see how it goes. Your feedback is most welcome.